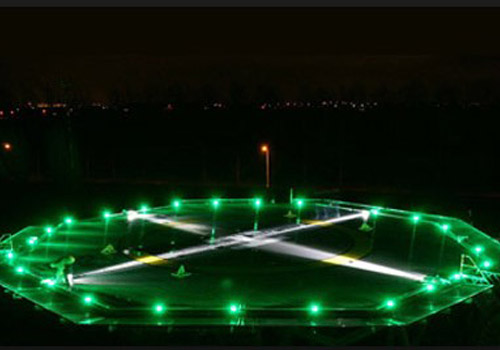
A minimum of eight equally-spaced lights should be used for square, octagonal and circular shaped FATOs, with proportionately more for larger rectangular shaped FATOs. TD/PM
The TD/PM should be lit by either flush-mounted, yellow panel lights or floodlights. Wind velocity information.
Approach guidance:
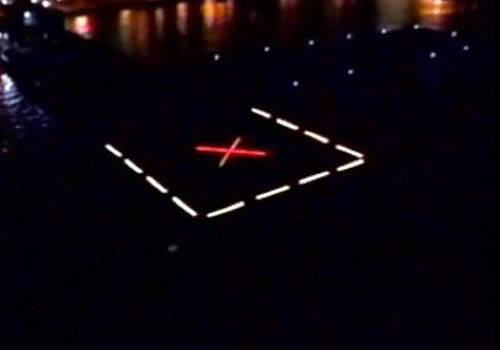
The standard approach direction(s) should be lit by point or panel lights, preferably flush to the HLS surface, depicted by yellow arrows similar in look to the painted markings. When it is considered essential that an accurate approach path be achieved due to the presence of obstacles, additional approach guidance lighting should be provided in accordance with Annex 14. Obstacle lighting should be provided where necessary, or operational limitations applied. Air taxiing route.
An air taxiing route should have a minimum width equal to 3 x the main RD of the helicopter and, depending on operational demands, be marked by either blue edge or green centreline lights spaced at 15 m intervals, or be suitably floodlit.
Visibility:
All lights, except air-taxiing route lights, should be visible from a distance of at least 3 km at the prevailing Lowest Safe Altitude (LSALT) in clear conditions.
Wind Indicator:
The wind indicator for night operations should be capable of being lit.
A helipad should include at least one Touchdown and Lift off (TLOF) area cantered in a Final Approach and Take off (FATO) area, a peripheral safety area and two or more approach and departure paths. The TLOF must be at least as long and wide as the rotor diameter of the helicopter to use the helipad. The FATO must be at least 1.5 times the overall length of the helicopter. The width of the safety area must be at least 0.33 times the rotor diameter, but not less than 6m. At least two approach/departure paths, with one aligned in the direction of the predominant wind, are required.
Call Now for a Free Consultation 02 4872 2257
Helipad Lighting
For night operations, the TLOF, FATO, taxiways, taxi routes, and windsock should be lighted. Other useful visual aids include: floodlights, landing direction lights, taxiway lights, a helipad identification beacon, and a heliport approach path indicator (CHAPI). Obstruction lights must be installed where required to mark objects in close proximity to the approach/departure path.
Touchdown and Lift off (TLOF) Lights
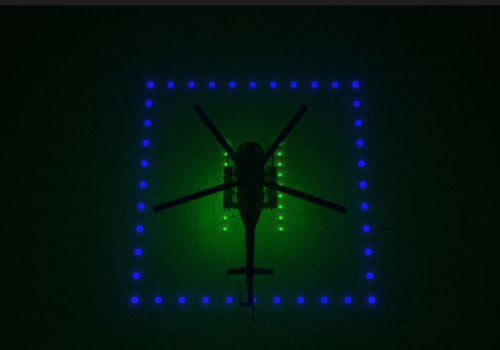
Flush green lights should be used to define the TLOF perimeter. Use a minimum of four light fixtures per side of a square or rectangular TLOF. Locate a light at each corner, with additional lights uniformly spaced between the corner lights. Using an odd number of lights on each side will place lights along the centre-line of the approach. Define a circular TLOF using an even number of lights, with a minimum of eight, uniformly spaced. Space the lights at a maximum of 7.6m. Locate flush lights within ft. 30cm inside or outside of the TLOF perimeter. As an option, raised, omnidirectional lights may be used to mark the TLOF perimeter. Locate the lights on the outside edge of the TLOF. Make sure the raised lights do not penetrate a horizontal plane at the FATO elevation by more than 5cm.
Final Approach and Take-off (FATO) Lights – Elevated, Inset
Green lights (with the same candelas as the TLOF lights) MUST BE used to define the FATO perimeter. lights with. Do not light the FATO perimeter if any portion of the FATO is not a load-bearing surface. Use a minimum of four flush or raised light fixtures per side of a square or rectangular FATO. Locate a light at each corner, with additional lights uniformly spaced between the corner lights. Using an odd number of lights on each side will place lights along the centre line of the approach. To define a circular FATO, use an even number of lights, with a minimum of eight, uniformly spaced. Space lights at a maximum of 25 ft. (7.6 m). Locate flush lights within 1 ft. (30 cm) inside or outside of the FATO perimeter. As an option, locate raised FATO perimeter lights, no more than 8 inches (20 cm) high, 10 ft. (3 m) from the FATO perimeter.
Floodlights
If ambient light does not adequately illuminate markings for night operations, floodlights should be used to illuminate the TLOF, the FATO, and/or the parking area. Floodlights should be placed so they do not constitute an obstruction hazard. Aim floodlights down to provide adequate illumination on the surface. Make sure floodlights that might interfere with pilot vision during take-off and landings are capable of being turned off by pilot control or at pilot request.
Landing Direction Lights
To provide directional guidance, install landing direction lights – a configuration of five green, omnidirectional lights on the centreline of the preferred approach/departure path. Space these lights at 5m intervals beginning at a point not less than 6m and not more than 18m from the TLOF perimeter and extending outward in the direction of the preferred approach/departure path.
Flight Path Alignment Lights
You may indicate available approach and/or departure path directions by placing green lights straight line along the direction of approach and/or departure flight paths. If necessary, extend the lights across the TLOF, FATO, safety area or any suitable surface in the immediate vicinity of the FATO or safety area. Install three or more green lights spaced at 1.5m to 3m.